Saturday, January 25, 2014

PlayStation Vita TV review: Sony's first mini-console has some growing pains


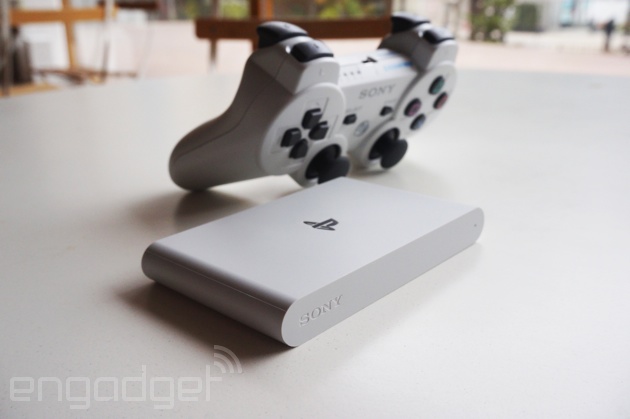
Sony had a tiny surprise to share just ahead of the Tokyo Games Show: the PS Vita TV, appearing from inside SCE President Andrew House's jacket pocket. Having already announced a new, slender PS Vita handheld less than an hour earlier, Sony showed off this minute console -- roughly the same footprint as a smartphone -- that plays Vita games, PlayStation games and streams video content, as well as music and video from Sony's own store. It can also connect with multiple PS3 DualShock controllers, allowing for proper, responsive gaming -- something we're not quite used to getting from something so tiny.
You could see it as a brutal counterstrike from the PlayStation team against the cheap, mini-console likes of OUYA and GameStickeven Huawei. Aside from contemporary Vita titles and indie games, you can also tap into an ever-increasing catalog of hits from yesteryear -- something that the Android and iOS platforms also dip their feet into, but with the peace of mind (read: stability) of PlayStation hardware, and the ability to steer the action with a DualShock controller. Sound like something you'd like to try out? Well, unfortunately, unlike the new PS Vita, this is currently a Japan-only deal. What's more, availability in Nihon is directly tied to compatibility there, too; you'll need a Japanese PSN account to even use it. We're still getting a vague line from SCE on whether it will eventually arrive outside of Japan. (It would be a convenient bit of hardware to sell alongside Sony'sPlayStation Now streaming-game service, set to launch in the US later this year, right?)
So, is this just a tenuous experiment or a whole new console line for PlayStation? Or, given that it's practically got all the same internals, would you be better off just buying a Vita?

Thursday, January 23, 2014

Android Root Tools, Drivers, and Some Apps.

Drivers and tools which you want for rooting.

ADB Fastboot and Drivers
http://rapidshare.com/share/E65FDE5B65AC4AF35A4310A6866A0EC2

Android Mobile Drivers
http://rapidshare.com/share/134645FFF3E10C5EC33BEE3905221CB2
These are not executable files. Select drivers update from Device Manager in My computer properties.

DooMLoRD_Easy-Rooting-Toolkit
http://rapidshare.com/share/23C10F8413C5D5198BE241CF293397D0

MTK_DroiD_TOOLS
http://rapidshare.com/share/0FB8E924114512E0CC780C5895D104E2

Root_with_Restore_by_Bin4ry_v3
http://rapidshare.com/share/D978AFD22A6FAF7A1EA52C9B56EBD68D

Super_One_Click_v17
http://rapidshare.com/share/CA66962EE63A40FF0813EB08685EE591

Mobileuncle apk
http://rapidshare.com/share/CA966F94164E3A2AC030F5C832BD85D1

ROM_Manager__Premium apk
http://rapidshare.com/share/C637046839AE92B3BDBD516F458BEA0E

Sygic maps apk
http://rapidshare.com/share/186B2CC88C6D84DCC5CF2ADD499A4C47


Download all above:
http://rapidshare.com/share/60D8DC42D11A836796D1F8D36C4FBCF5

DJI's Phantom 2 Vision takes a stabilized camera to the sky,

#win
You may not have come across DJI before, but this brand is no stranger in the world of hobbyist drones. Even production studio use the company's gear for aerial videography, but that involves a lot more money than the average consumer can stomach -- DJI's three-axis camera gimbal alone can cost up to $3,500, on top of about $3,000 for its latest six-rotor aircraft. And this is before you include a camera plus a remote control. Fortunately, we now have a more affordable option that still comes with camera stabilization: the Phantom 2 Vision.
With a $1,199 price tag, this all-in-one package is aimed at prosumers who are looking for something more serious than, say, Parrot's AR.Drone series. While the latter's designed for entertainment, the Phantom 2 Vision gives you a taste of the advanced maneuverability and camera features from DJI's pro-level products. The relatively light 1.16kg drone features a built-in 14-MP Camera(with a 1/2.3-inch sensor), which is mounted on a tilt-axis gimbal under the belly. The only bits that need to be installed are the four self-tightening propellers, along with a swappable 57.72Wh battery that lasts up to 25 minutes (but takes from one to two hours to fully charge when depleted).

DJI's Phantom 2 Vision takes a stabilized camera to the sky, we go hands-on

Friday, January 17, 2014

DooMLoRD Easy Rooting Toolkit to root Xperia Devices


For following devices:

Full Phone Backup without Unlock or Root

This guide assumes you have already installed the Android SDK, and updated the Android SDK Platform Tools to the latest version (currently Rev 10) using the SDK Manager.

1. Connect your device via USB, and open a command prompt.

2. Optionally, type the command 'adb devices' to ensure that your device is properly recognized. If you're comfortable with ADB already, just skip this.

There is a command, 'adb backup' (to be detailed shortly), that will now allow you to create a full system backup. 

The command parameters format is:

Quote:
adb backup [-f <file>] [-apk|-noapk] [-shared|-noshared] [-all] [-system|nosystem] [<packages...>]
The most basic command you can use* is simply:

Quote:
adb backup -all
This will use the defaults to backup only app and device data (not the APKs themselves) to the current directory as 'backup.ab'

* This may not work for every setup. If you get an error such as "adb: cannot open file ./backup.ab", use:

Quote:
adb backup -all -f C:\backup.ab
Or substitute the path of your choice in place of C:\.

To explain the parameters:

Quote:
-f <file>
Use this to choose where the backup file will be stored, e.g. '-f /backup/mybackup.ab', which will save it at the root of your drive (C:\ for Windows, etc.) in a folder called backup, as a file named 'mybackup.ab'. I recommend using this flag to set a location manually, as with my first backup test, it said that it completed successfully, but I was unable to locate the backup file. I have no idea where it was saved, but it wasn't where it should have been located.

Quote:
-apk|-noapk
This flags whether or not the APKs should be included in the backup or just the apps' respective data. I personally use -apk just in case the app isn't available in the Market, so that I don't have to go hunt it down again. The default is -noapk.

Quote:
-shared|-noshared
This flag is used to "enable/disable backup of the device's shared storage / SD card contents; the default is noshared.", which for the Nexus I would certainly flag to -shared, but from my test, it did not restore all of the contents of my internal storage, so I recommend backing up music, pictures, video, and other internal storage items manually, just to be on the safe side. The default is -noshared.

Quote:
-all
This flag is just an easy way to say to backup ALL apps. The packages flag (further on) can be used to choose individual packages, but unless you're just wanting to backup a specific application, use -all for a full system backup.

Quote:
-system|-nosystem
This flag sets whether or not the -all flag also includes system applications or not. I used -system, but this is probably unnecessary, and I would almost guess that it is safer to use -nosystem, but use your own judgment on this. The default is -system.

Quote:
<packages...>
Here you can list the package names (e.g. com.google.android.apps.plus) specifically that you would like to backup. Use this only if you're looking to backup a specific application.

3. Once you've made your decision on how to perform the backup, simply type the command as you would like it; in my case, this is the command that I used:

Quote:
adb backup -apk -shared -all -f C:\backup20111230.ab
4. You will see a screen like the following:


5. Enter a password (if desired) for encryption of the backup file. RETAIN THIS PASSWORD FOR RESTORING LATER.

6. This process will take several minutes to complete, depending on the settings you've chosen, but when completed, you will get a toast on-screen saying 'Backup Complete', or if you miss that, you'll know once your phone returns to the home screen.

7. Now go unlock your bootloader (not going to go into the process for this guide, but you probably know how already, and if not, there are several guides a search away).

8. Once you're booted back into Android, you can choose to add your account now, or skip that for later. I skipped it for later, but I think it might make the process more smooth to sign in before the restore. YMMV. 

9. To restore, with your device connected open your command prompt again, and type:

Quote:
adb restore C:\backup20111230.ab
replacing 'C:\backup20111230.ab' with the location of your backup file. 

10. You will see a screen like the one below:


11. Simply type in your current encryption password (if you've set one), and the password with which the backup was encrypted (if you chose to set a password), and the restore will begin. It again will take several minutes depending on the size of the backup and the options chosen.

12. You're back to normal, short of possibly some widgets on the home screen. My wallpaper was even restored, my app folders remained just as I had them before, my alarms remained, and for most applications, I didn't even have to log back in; it kept everything. 

________________________

NOTE: I did have an issue with not all files being restored to the Internal Storage; in particular, the Gallery still displayed all the folders and files that it had cached (which it expected to be there) as only gray boxes, and would not display the images, nor would it rescan the media. I simply copied the files back to the Internal Storage directory manually, and all was well again. Again, YMMV. 

NOTE 12/31: Also to note, this will not back up SMS messages, so if you're concerned about those, you may want to look into an alternative application to back up SMS. 

NOTE 06/12: There seems to be a bug in which backup and restore operations will fail unless a desktop backup password is set under Developer Options. It will not work with a blank password.